Microsoft Flow
For Partners
How to setup Microsoft Flow with Storefront Dynamics
Microsoft Flow is an app that is part of the Office 365 suite. It allows you to automate business processes by building workflows based on certain triggers and actions. Storefront Dynamics Starter Site supports Microsoft Flow by providing outbound and inbound connectors that are used with Microsoft Flow
How to setup Storefront Dynamics Flow
Storefront Dynamics outbound connector is a service that is provided in the Starter Site. It triggers events in the Storefront Dynamics starter site that are consumed as a data source in Microsoft Flow to handle events and take action.
The inbound connector in Storefront Dynamics starter site is used by Microsoft Flow when a custom flow requests a task to be performed by Storefront Dynamics based on events that are triggered by other applications.
The support of Microsoft Flow enables Storefront Dynamics to be integrated with any application or service used in the customer environment. Example of features that are commonly integrated in a retail solution are:
- Customer creation in any Dynamics 365 application. When a customer is created in Dynamics 365 Storefront Dynamics is invoked by a flow to add user account credentials for e-commerce access.
- Customer update in any Dynamics 365 application. When a customer is created or updated in Dynamics 365 Storefront Dynamics is invoked by a flow to add or update customer information in Episerver to be used by other Episerver applications for digital marketing.
- Newsletter subscription. When a customer registers for a newsletter subscription a flow is triggered in Microsoft Flow to add newsletter subscription to marketing services such as Dynamics 365 CRM and MailChimp.
- Sales transaction created in Dynamics 365. A Microsoft Flow is triggered when a sales transaction is created in a store or online. The flow updates a CRM or loyalty system with the transaction information.
- Abandoned shopping carts. Let Storefront Dynamics trigger a Microsoft Flow whenever an abandoned cart is detected in the e-commerce solution. The flow uses the cart information for digital marketing and business intelligence.
- Wish list update. Wish lists are saved and managed in Storefront Dynamics starter site and propagated by Dynamics 365 to stores. The wish list is a list of items that a customer is interested in and may be sent to any digital marketing service using Microsoft Flow.
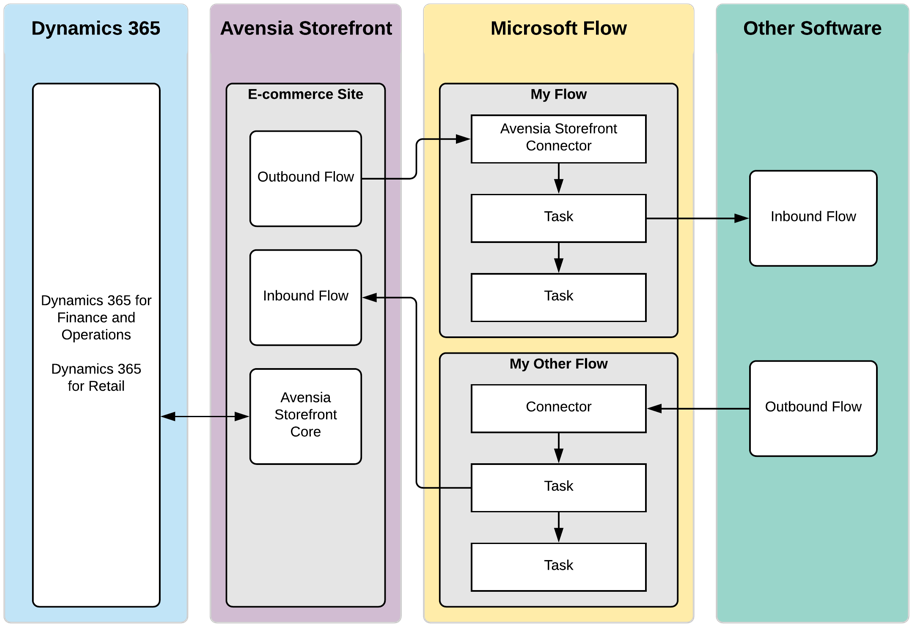
There are two reference flows implemented in Avensia Storefront starter site.
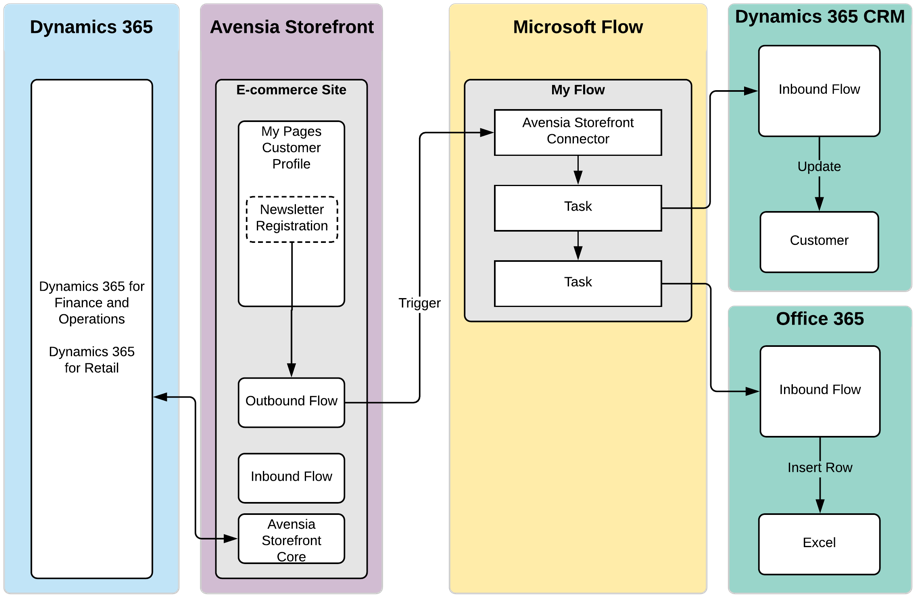
- Outbound flow. The default behaviour of Storefront Dynamics Starter Site is the Newsletter Registration trigger. Microsoft Flow is triggered whenever a user in the starter site registers for a newsletter subscription. The information provided by the Avensia Storefront Flow connector includes the user information and the mail address of the newsletter. The flow created in Microsoft Flow may update any application with the subscription information provided.
- Inbound flow. The default inbound flow implemented in Storefront Dynamics starter site is the customer creation flow that is invoked by a Microsoft Flow whenever a new customer is created in Dynamics 365 for Finance and Operations or Dynamics 365 for Retail. The flow creates a user account in the e-commerce solution and assigns the user account with the customer object in Dynamics 365 FOP.
Setting up Storefront Dynamics Outbound Flow
Follow these steps to create a connection in Microsoft Flow that consumes the outbound flow in Avensia Storefront starter site. The steps of consuming Avensia Storefront Flow are similar when more events than the default implementation are defined in a customer web solution.
Storefront Dynamics Starter Site uses the newsletter registration event as a foundation to be used as a demo and best practice of Microsoft Flow. In a customer project are more events and information extended to be triggered in Microsoft Flow by Storefront Dynamics.
Create an Storefront Dynamics Connector
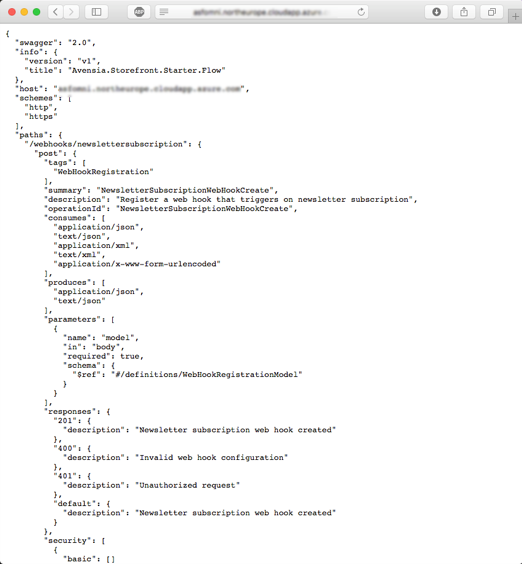
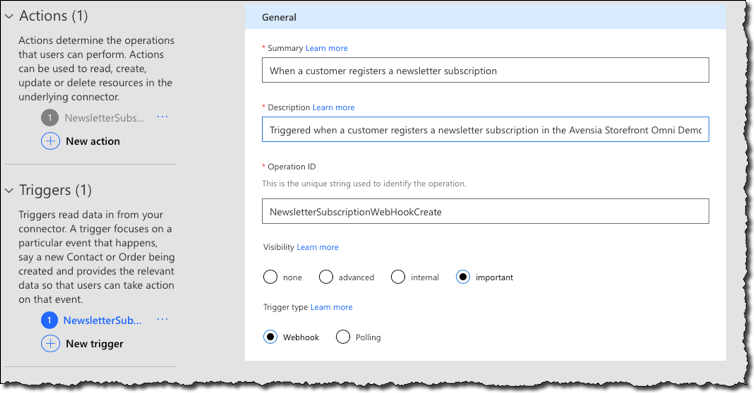
The Storefront Dynamics Starter Flow is accessed by Microsoft Flow through a Custom Connector that is created in the Microsoft Flow subscription based on a Swagger definition file provided by Storefront Dynamics Starter Site. The default implementation of the Flow Connector triggers newsletter registration in the start site.
Create a custom Microsoft Flow connector and connect it to Storefront Dynamics Starter Site like this:
- Create a Swagger file. Browse to the URL http://[The Starter Site]/swagger/docs/v1 using a tab or web browser, and copy the JSON-text that is displayed in the web browser into a new text document in Notepad. Make sure to select all JSON-text in the browser content.
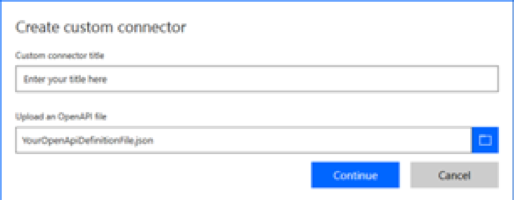
- Save the text document as a local file with the file extension .json, e.g. MyOpenApi.json.
- Login to your subscription at http://flow.microsoft.com and browse the settings page.
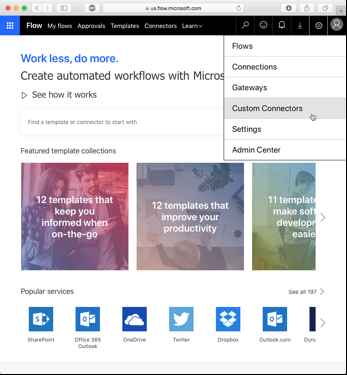
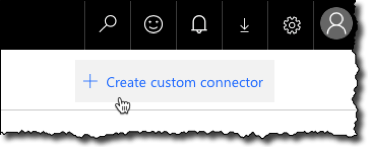
- Under Custom Connectors click Create Custom Connector and select the method Open an OpenAPI file.

- Create a title of your connector and select the JSON-file that was saved locally in the previous steps.
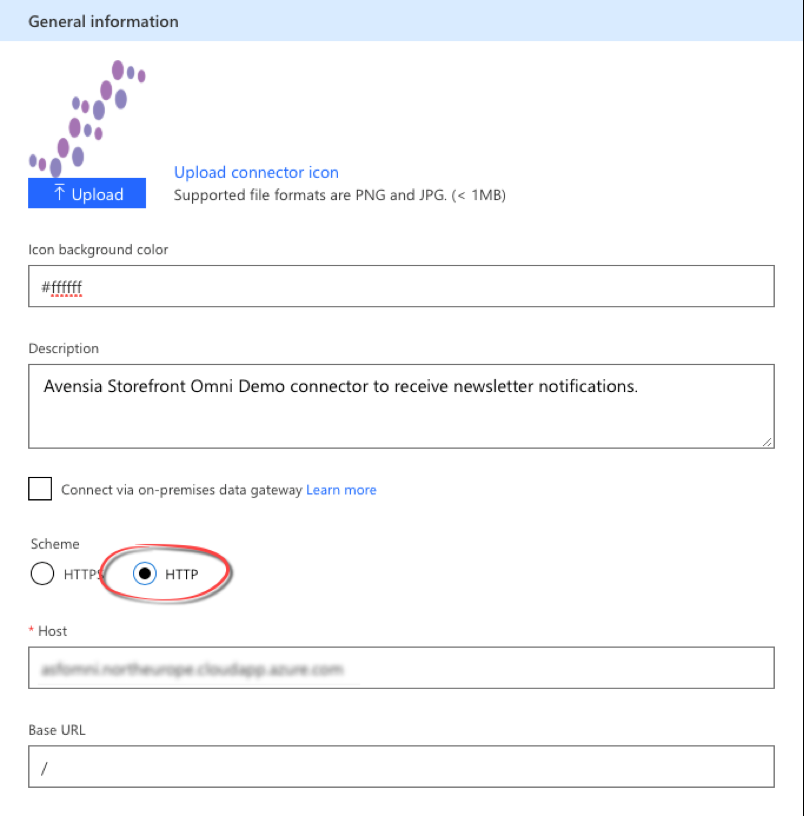
- In the General Information Form displayed in the next step, select http as the scheme since Avensia Storefront Starter Site only supports the http scheme. Upload an image for the connector (optional) and give the connector a description (optional).
- In the Authentication Form, enter the labels that will be displayed when a flow using the connector is created. I.e. do not fill in the actual username/password for your endpoint.

- In the definition form, review the available actions and triggers. The values come from the OpenAPI definition file that was imported and should be good to go. But if not, change as needed. Summary and Description of the trigger may be useful.
- Create the connector by clicking Create Connector in the page header. It takes some time for Microsoft to setup the connector.
Create a Flow Consuming Storefront Dynamics Flow
This chapter describes how to create a simple flow that sends a push notification to a cell phone whenever a customer registers for a newsletter in Storefront Dynamics Starter Site.
To be able to fulfil the example, the following pre-requisites must be met:
- An active subscription of MS Flow is required.
- Storefront Dynamics Starter Site installed in a domain that can access Microsoft Flow. The Custom Connector that is created in Microsoft Flow is called by Storefront Dynamics Flow whenever an event is triggered.
- A custom connector for Storefront Dynamics Flow has been created in the Micrsosoft Flow subscription.
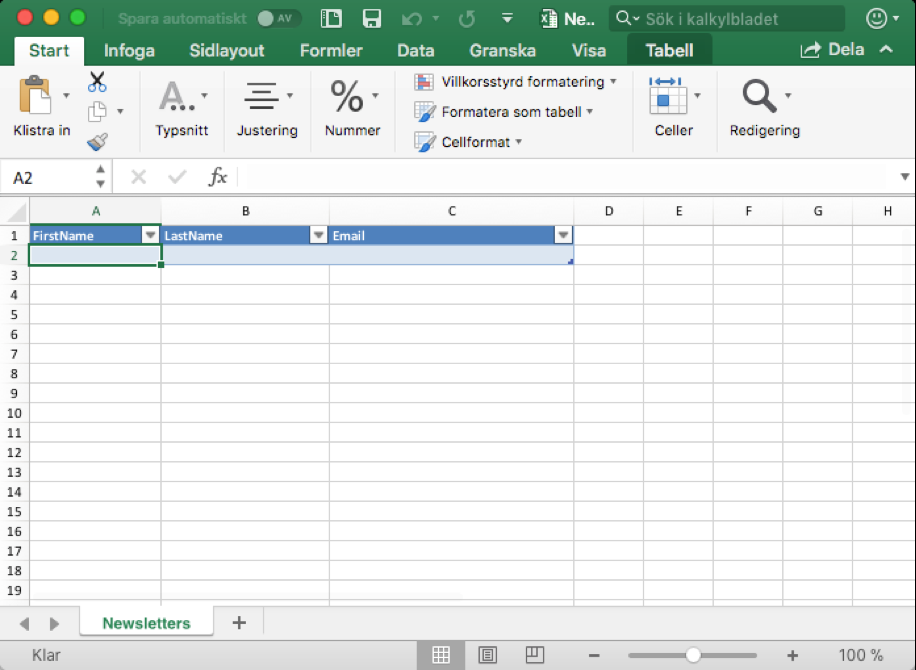
- An Excel book created in a folder accessible by Microsoft Flow. The demo described in this document refers to an Excel book created in a OneDrive for Business folder.
Setup the MS Flow following these steps.
- Ensure that there is an existing Excel Book with a tab with a table with at least three columns; First name, Last name and E-mail. There are no restrictions in the naming of the document, the tab, the table or the columns.
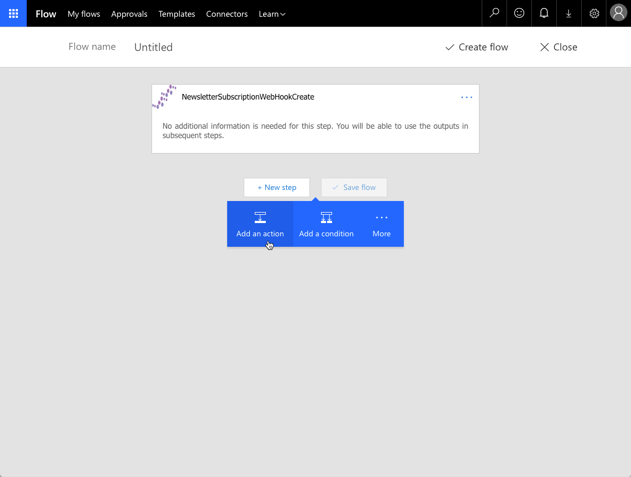
- Login to http://flow.microsoft.com and select My Flows and click the Create from Blank option in the menu bar.

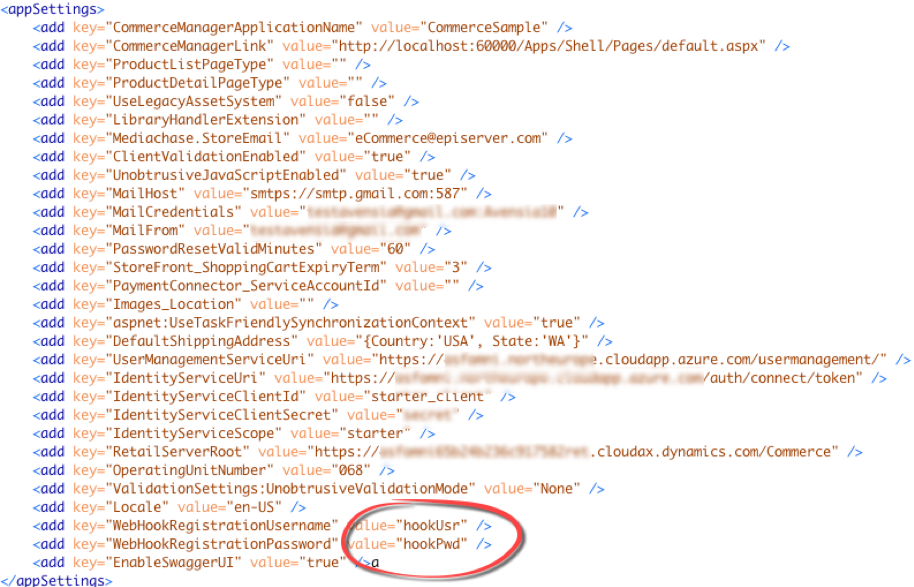
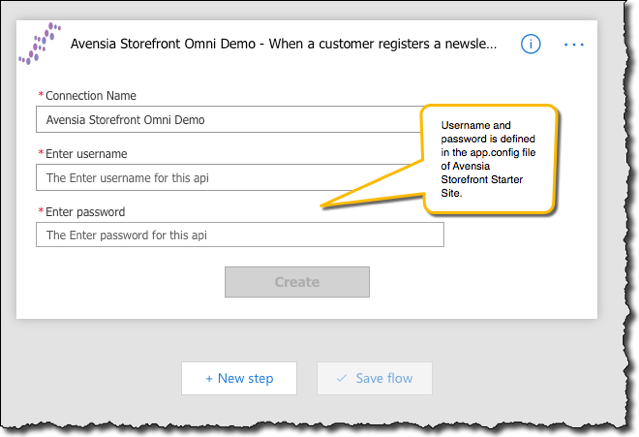
- Enter a description and the username and password of the connector. The username and password are available in the appsettings.config file for the Avensia Storefront Starter Site. The default username and password are displayed below.
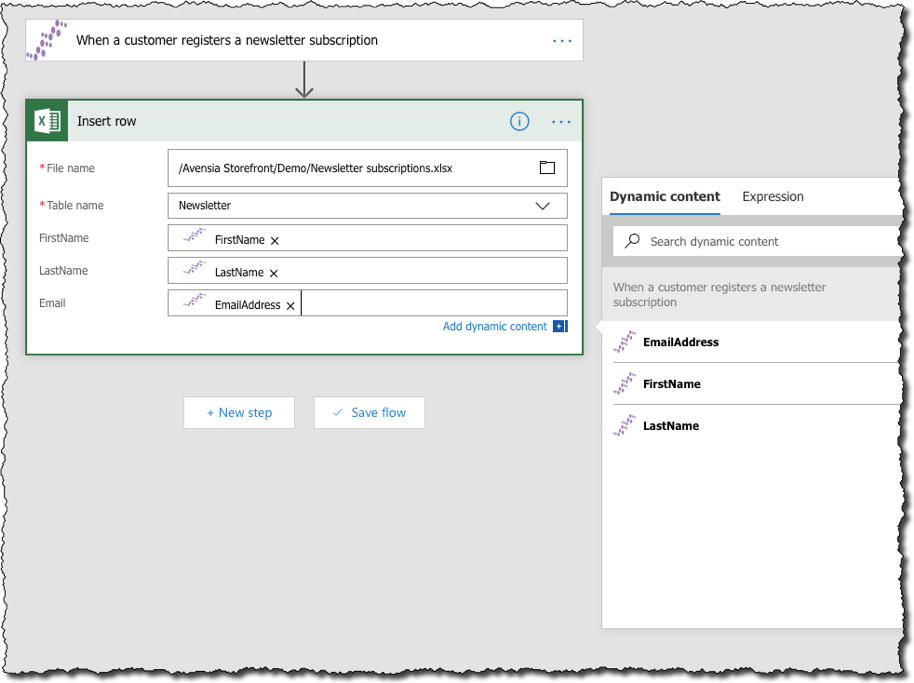
- Select the connector, and the flow design starts. The connector is displayed as the first step of the flow. Click the option to Add an Action and search for Excel. Select the option “Excel - Insert row”.

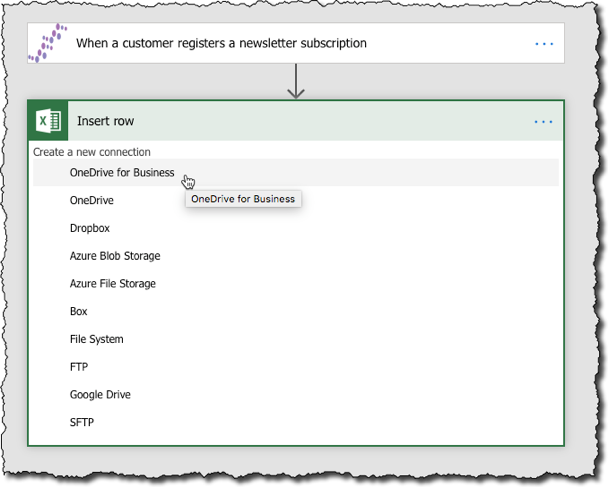
- Select an Excel book stored in a folder accessible by Microsoft Flow. This demo suggests using Onedrive for Business. Enter all credentials needed to access the Excel book.
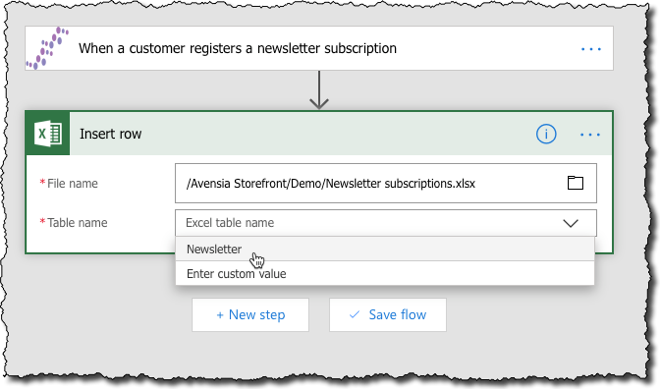
- Selecting the Excel book will provide the option to select the table in the Excel document.
- Add the information that will be inserted into the row of the Excel table. Click the dynamic fields provided by Avensia Storefront Flow Connector.

- Give the flow a name and save it.
- Use the Storefront Dynamics Starter Site Flow to verify that the Custom Connector has been attached to the site.
- Open an incognito web browser and navigate to http://<my starter site>/Episerver and login as a user of CMS Web Editor role, preferable as an administrator. This is necessary to access the information in next step.
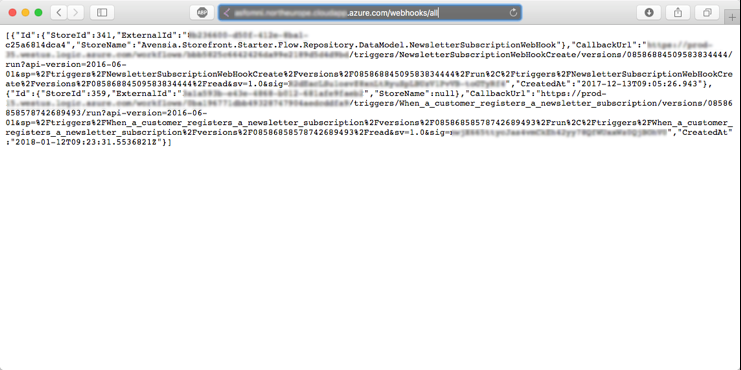
- In the address field of the browser, replace the URL with http://<my starter site>/webhooks/all.
- The browser displays all attached web hooks using a JSON format. The example below displays more than one web hooks.
Using the Flow
All newsletter registrations are triggered by Storefront Dynamics Flow. The Microsoft Flow created in the previous chapter catches the events and runs the flow. 
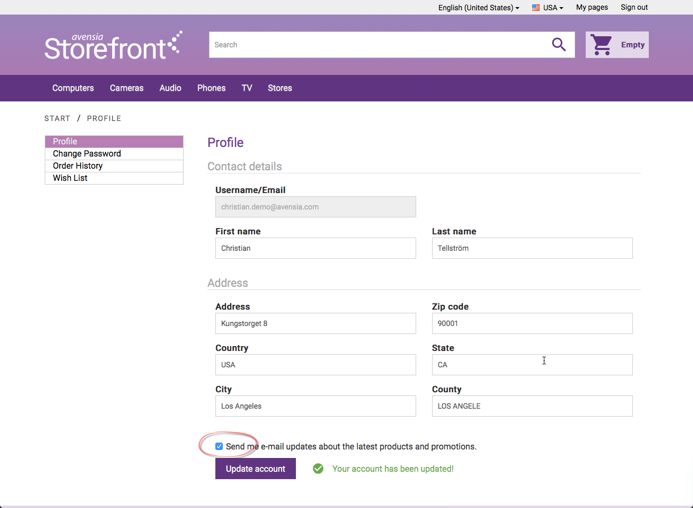
To test the flow, login to Storefront Dynamics Starter Site as a customer, and select a newsletter subscription in My Pages/Profile. Save the changes using the Update Account button. The event should be triggered immediately by Microsoft Flow.
Check the execution of the Microsoft Flow. The flow indicates when last executed, and by clicking the execution information are details available. 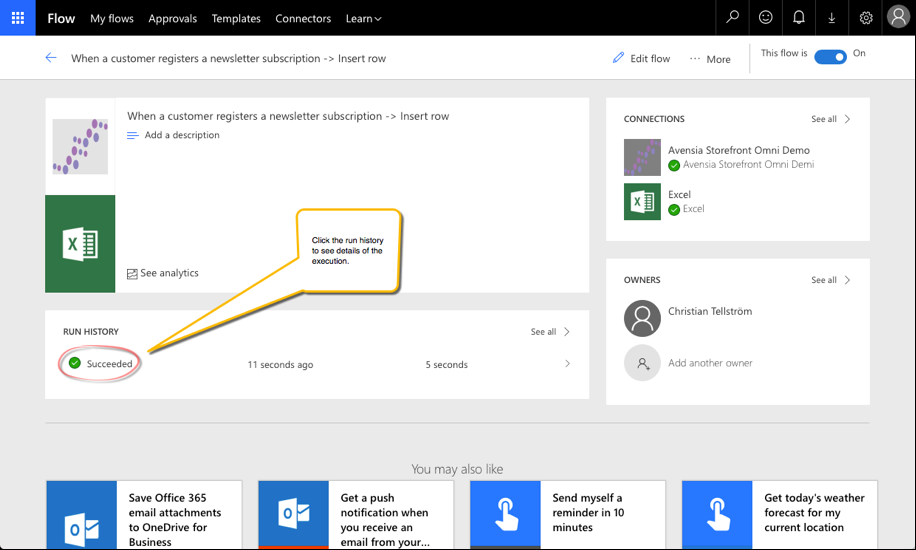
The execution details show how each step of the flow was executed. 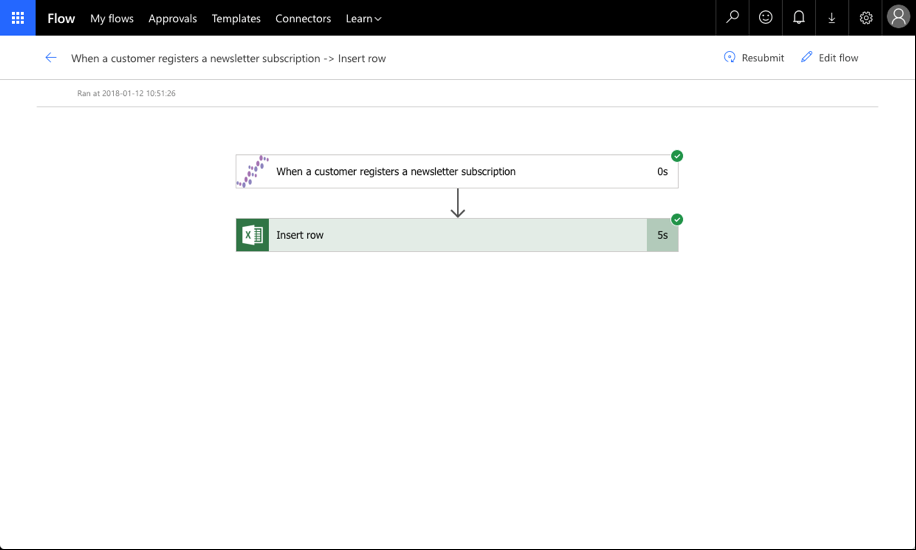
Open the Excel Book and verify that a row has been inserted. 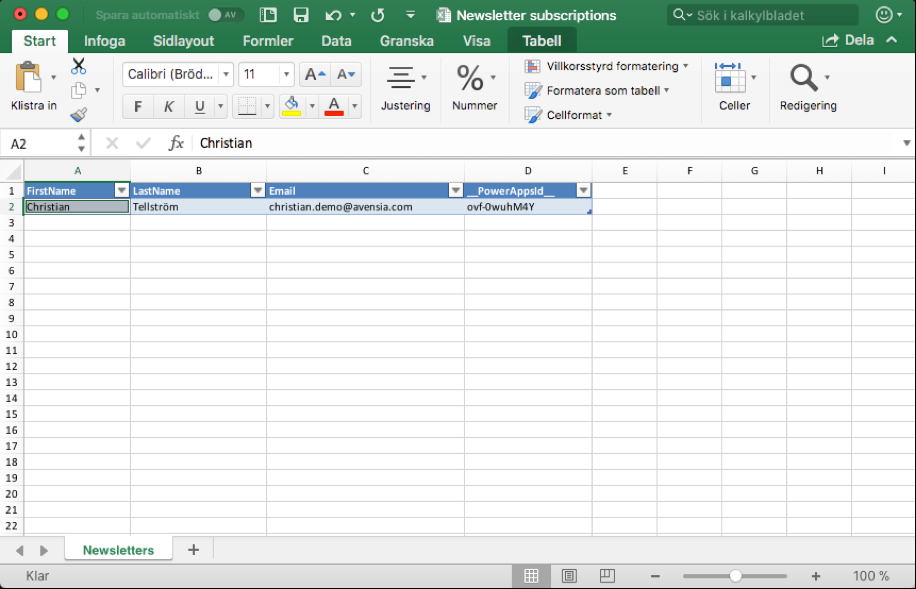
Setting up an Inbound Flow using Storefront Dynamics Flow
When a customer is created in Dynamics 365 for Finance and Operations, Dynamics 365 for Retail or Dynamics 365 for Sales the customer object created do not have any user account information in the Storefront Dynamics Starter Site. The customer will not be able to log in to the web site. The only way to let the new customer log in is to create a new user account for the customer in Storefront Dynamics Identity Provider and connect it to the customer in Dynamics 365.
The user account created in the identity provider uses by default the e-mail address as username. The password is set in the identity provider and an Access Token is created by the provider. The customer entity in Dynamics 365 is updated with the access token to allow Dynamics Retail Server to recognize the customer when it’s logged in to the web site and uses the retail features of Dynamics 365.
The process to create a customer in Dynamics 365 and to create an account in the identity provider may be performed manually. It is however not possible to assign the access token generated by the identity provider to the customer manually. This is one reason that the flow support has been added to Storefront Dynamics Starter Site.
Pre-requisites
To be able to create a customer account using Storefront Dynamics Flow must the following requirements be met.
- An active subscription of MS Flow is required.
- Avensia Storefront Start Site installed in a domain that can access Microsoft Flow. The Custom Connector that is created in Microsoft Flow is called by Storefront Dynamics Flow whenever an event is triggered.
- A custom connector for Storefront Dynamics Flow has been created in the Microsoft Flow subscription.
- The Customer Link Activation Email Page must be set in the Site Structure tab of the Start Page.
The customer created in Dynamics 365 must be created with a primary mail address as contact.
Create a customer account
The process of creating a customer in Dynamics 365 and get an account for the customer using the Storefront Dynamics Flow is described in the following flow chart.
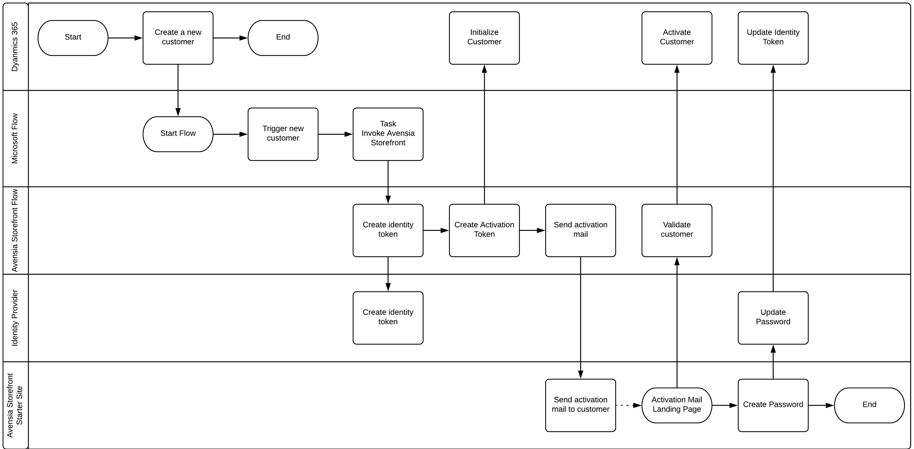
In Dynamics 365 there is a default Customer Activation process that is invoked by Storefront Dynamics using Microsoft Flow. In the default solution, the following flow is supported.
- A customer entity is created in Dynamics 365. Manually or by a service.
- A Microsoft Flow is triggered that a new customer has been created.
- One step in the flow gets the new customer e-mail address from Dynamics 365.
- Next step in the flow invokes Storefront Dynamics Flow and passes the e-mail address.
- Storefront Dynamics Starter Site gets the customer from Dynamics 365 and initiates the activation flow in Dynamics 365. The customer is marked as Initialized by Dynamics 365. The process can’t be monitored in Dynamics 365. There is no user interface for the process.
- The customer is created in the Storefront Dynamics Identity provider by Avensia Storefront Flow. The user is created with a temporary password that is never distributed to the customer.
- An Activation Token is created by Storefront Dynamics for the customer. The token is a unique string of characters. The default token is built by a GUID. The token is attached to the customer in Dynamics 365. The customer in Dynamics 365 is waiting for finalizing.
- A mail is sent by Storefront Dynamics to the new customer using the e-mail address provided. The mail includes the Activation Token embedded in a link. The customer clicks the link and is redirected to an explicit landing page in Avensia Storefront Starter Site.
- The landing page checks the e-mail address and the activation token, and sets the customer as initialized in Dynamics 365.
- The customer is redirected to the Set password page in Storefront Dynamics Starter Site.
- The customer enters a new password. The customer doesn’t have to enter any old password. The new password is updated in the Identity Provider and the new access token generated by the identity provider is set on the customer in Dynamics 365. This enables Dynamics 365 to trust the customer when it’s logged in to the web site.
- The customer is fully activated and can log in to the web site.
The activation mails
The activation mail sent to the customer is by default sent by Storefront Dynamics. There is a flow in Dynamics 365 that may be used to send the mail if required. The mail template required by Dynamics 365 is however not included in the Contoso Demo Data.
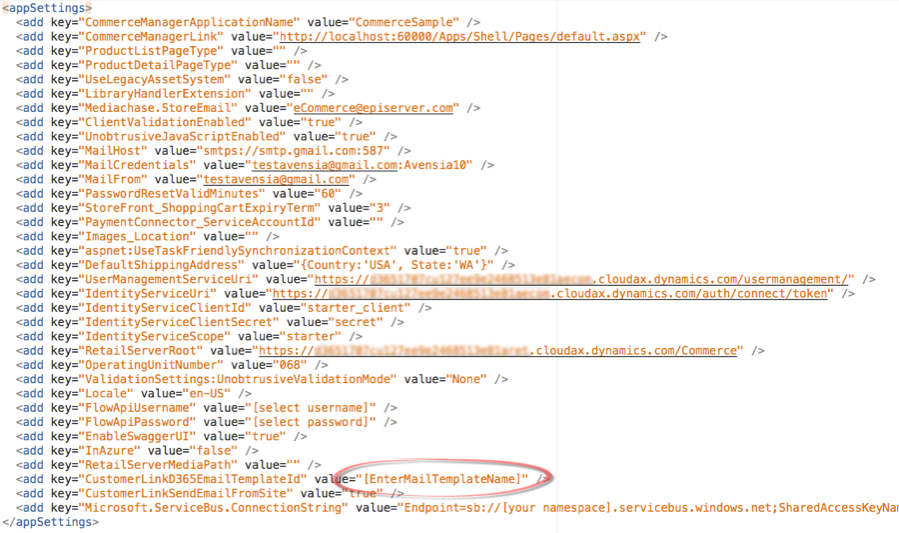
In the default configuration of Avensia Storefront there is a mail template setting that is used by Storefront Dynamics and Dynamics 365. The setting is used to identify the mail template in Dynamics 365 to use for the activation mail. The default setting in Avensia Storefront is a template name that does not exist in Dynamics 365 to avoid that Dynamics 365 sends an activation mail when Storefront Dynamics already does.
The configuration is made in the configuration file appsettings.config that is found in the web site root folder. The configuration below is the default configuration. The default value of the CustomerLinkD365EmailTemplateId should be used to avoid Dynamics 365 to send any mail. Changing the value to the Id of an existing mail template will enable Dynamics 365 to send the activation mail. Storefront Dynamics then must be customized not to send the mail.